Showing posts with label art. Show all posts

Thursday, June 2, 2011

Little Houses


Whether you call them cottages, dwellings, cabins, houses, abodes, homes... little habitations and villages
in tangible art are so adorable. The sweet, colorful versions have their whimsical appeal. 
But I am also drawn to their rustic and illustrator counterparts as well. 
I am not a huge collector, but a little shelf dedicated to village art would be most welcome.


Tuesday, May 17, 2011

Colorful IKEA Love


We went to IKEA with our way awesome Swedish friend over the weekend. I feel in love with this fabric... and how they hung it with coordinating yardage like tapestries. I'm going to do that... eventually.

design: Lotta Kuhlohm 2008 IKEA of Sweden AB, Annamoa range


Apparently, the 'art' of the couches is to awesome to sit upon. Really, some of those couches were so full of crap, there would be no way to sit on them anyways. (Some really were awesome though). Maybe that is what I will do with my white slipcovers when they become too stained for the bleach to handle, just color the heck out of them and call it art.


 I love this... how simple! It's just a curtain rod hung vertically on the ceiling. Something I am totally equipped to lovingly/sweetly nag my not extremely handy husband to do.


Wednesday, January 26, 2011

Illustrator: Jason Holley


 Jason Holley is an illustrator and art teacher at the Art Center College of Design in Pasadena. I am quite fond of these prints of his, I especially adore his "The Newest Indians." There is quite a bit of charm and depth to his little subjects, he obviously has a lot of respect for nature and science.


Thursday, September 16, 2010

Homefront: Living Room Picture Gallery Wall

The gallery wall is complete. We ended up moving furniture around, for whoever remembers my last post about this room. I had to stretch the gallery out a bit to cover this large space, so it isn't as neat and compact as my last one, but I like having one large art wall, instead of pictures randomly around the room. I ended up using some other pieces that I had in other rooms, but especially love my two new additions.

For whoever remembers my last post about this room, we switched the armoir and tv, and I think there is much better flow in here now.The room feels more functioning and like it doesn't revolve around this huge television.

I  miss my white slipcovers, but thought a change of scenery would be nice, so I am using my old Surefit brown ones instead. This time of year just calls for something a little less bright, though white would look pretty for Christmas time.
My mom visited for Labor Day and she brought with her this lovely housewarming gift. I have admired these paintings by Huldah Cherry Jeffe for several years now at our favorite antique mall, so this is a real treasure.

And my sister, who also visited with her family, brought me this adorable decoupaged sign from the same antique mall. I love the shape, colors, and especially that beautifully ornate antique key. My family really knows me. I'm not sure where to put it yet, but for now, it looks all fancy on this vintage shutter.

Wow, this beast of a fireplace looks so bare now that all of my art is on the wall. I agree, a large mirror would look best there, but the mantel is too weak to support one and I just can't get myself to drill and risk getting in trouble from the landlord. I thought keeping the color palate simple and neutral would look the best. Of course it will be changing frequently, as any of my blog readers know, I must change the mantle!

I still would like to get an area rug, a nice sized coffee table and some end tables, maybe make a cute garland for the mantel, maybe some paint on the armior and tv stand, our family pictures and plate wall up somewhere, but those temporal details can wait. Because all that really matters, are that these boys are happy. Off to make some queso.


Wednesday, September 15, 2010

Inspired Guest: Bret Pendlebury's Vintage Photo Art


I recently discovered Bret Pendlebury when creating my red and blue illustrations post. His work is simple, yet unique and those faces really stick in my mind. Before I ever read his blog, I thought to myself, "those remind me of vintage photos".


His photos focus on his vintage photo collection, primarily the 1930's, but he is open to custom work for portraits from photos of a role model, your parents, grandparents, family, and loved ones. And now, into houses.


He uses many different mediums for his work, ink, colored pencil and permanent marker, acrylics, watercolor, and his canvas is typically on a recylced material.


Some of his characters have a forlorn look, others are a bit more chipper. All unique and what I really want to know, is does he name them, or are those the names on the backs of the photographs, and will he ever sell prints?

 
From what he did share is this, "i was raised in coconut grove, a charming neighborhood on the bay in miami, florida. currently residing in the city of brotherly love, philadelphia, pennsylvania. i studied fine arts at new world school of the arts college. recently i have been creating portraits inspired from vintage photos i have collected. i'm influenced by simple raw beauty, traveling, nature & much more. I hope that my work inspires you."

Ruth Phillips

bret's:  shopblogfacebook fan page

Wednesday, September 1, 2010

Inspired Art: Red and Blue Illustrations


I have really be drawn to illustrations and the like lately, I thought this collection of red and blue designs looked smashing together. I am a little surprised at how many amazing portraits there were, I seriously had to refrain from posting more. But, you can find more blue and red illustration art here. They woulld look beautiful all framed together in tawdry, chipped up dark wood thrift store frames all gallery like.

Thursday, June 3, 2010

Homefront: Easy and Inexpensive Ephemera Collage Art


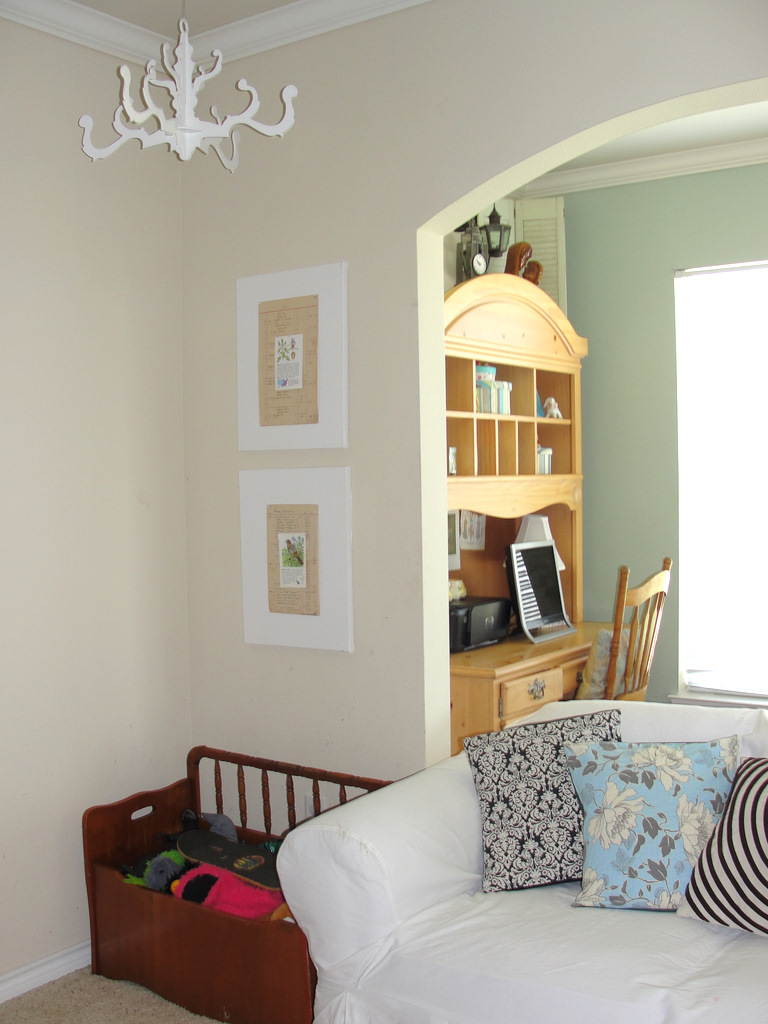
This little art project takes about 15 minutes and costs about $15. It takes up a nice little piece of wall space too. If you were to get 4 canvases and put them in a square shape, it could make a nice headboard as well.


First, I got a pack of 2 stretched canvas for $9.99 and some corsage pins for .87 cents. You need 4 pins per main paper, and one pin for the middle paper. So, 5 pins per piece of canvas.


I had a 
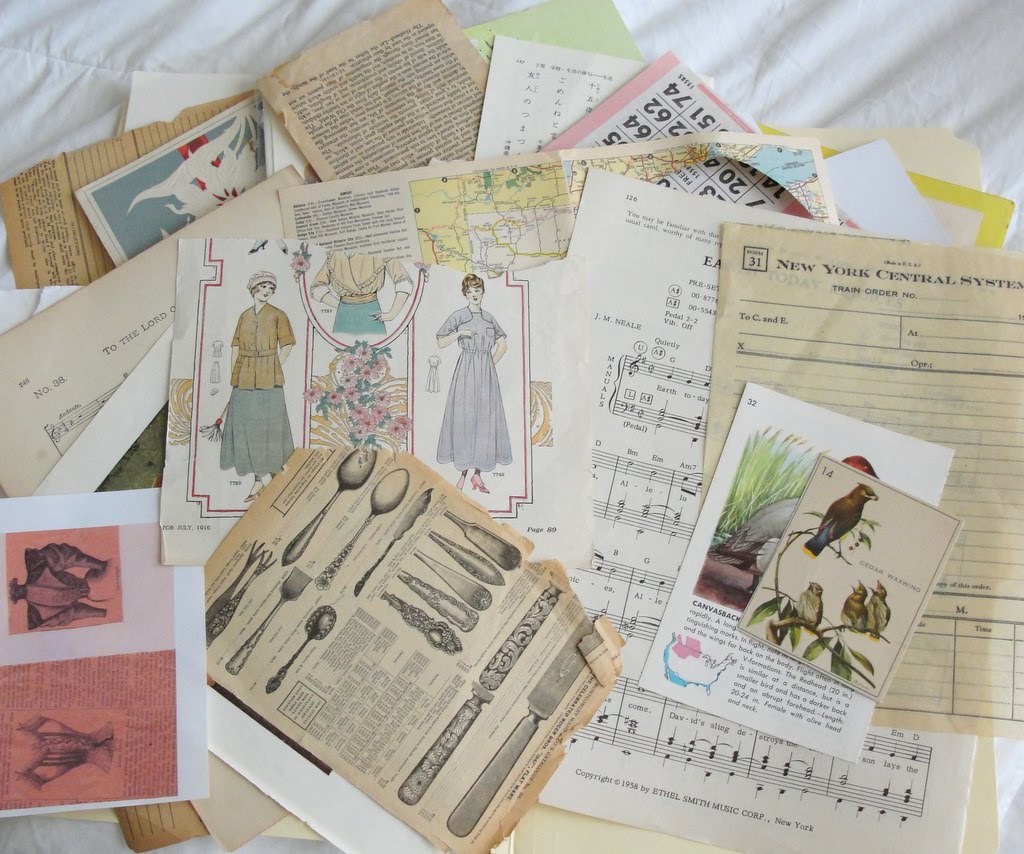
pack of ephemera I got from dodipc, mixed with some papers I had been collecting. Ephemera is essentially vintage papers, maps, patterns, photographs, text, bookplates, receipts, postcards, love letters, ledger papers, music sheets, flash cards, ticket stubs, advertisements... Very easy to collect at antique malls and packs can be found on Etsy or Ebay. You probably have something right now you could use. Or, visit The Graphics Fairy and print some free vintage images. Try tea staining some current papers for a similar effect, lots of methods explained here.


There is something so romantic about ledger paper. The crisp, black ink, and the nearly perfect fonts of the handwriting transports me to a time when men were gentlemen and took such care in the way records were presented. Each capital letter is curled beautifully, and the words form on the lines in straight perfection.


 I didn't paint the canvases, but any craft acrylic paint will do if you wish to paint. If you do, remember to paint the sides of the canvas as well. I was going to tape the ledger paper directly on the canvas, but tape doesn't stick, so I used the corsage pins instead. You could also glue the paper down, but I prefer to change things at random, and have a hard time gluing down certain vintage papers, so I kept it as reversible as possible.


I taped the pins down on the back of the canvas to help keep them in position, though a stronger tape would probably be best. Or, you could always embroider the paper down instead of pin it. I love the elongated pearly tips and angled them to emphasize the corner of the papers. Vintage hat pins would work as well.


This project is so quick and easy, with minimal clean up after wards. The papers you choose is limitless, and they don't have to match perfectly either. You could even use a photograph of your children as the center piece. Or glue the back paper on, and change the front paper depending on the season. You can frame them as well if you want, but I just wanted a quick and simple piece of art for this wall space.


Linked to: Simply Designing Linky Party, Finding Fabulous Frugalicious Friday, Tater Tots and Jello DIY Linky, The Shabby Nest Frugal Friday
Related Posts with Thumbnails