Sunday, January 20, 2013

DIY: Easy Jersey Flower Headband from Cut Off Yoga Pants


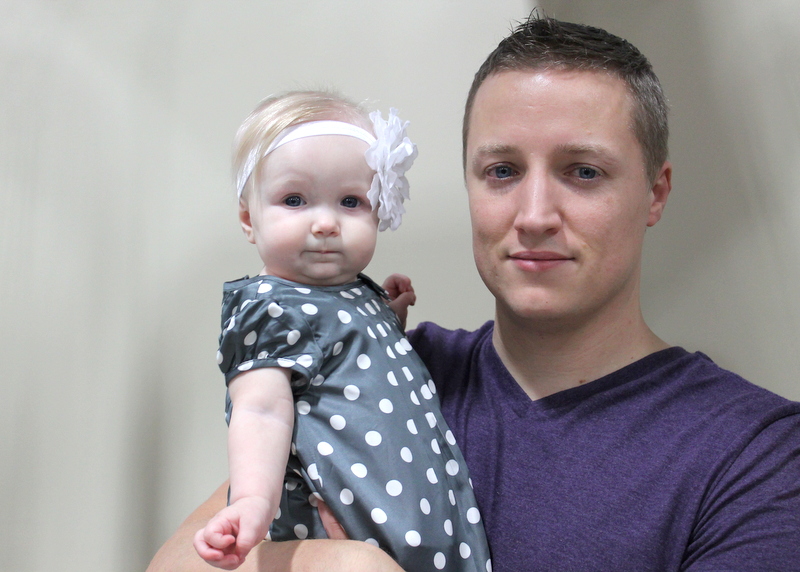
Being the short person that I am, I have many pants which are too long. So, I took these super comfy grey jersey pants and cut a few inches off the bottom. When I looked at my leftovers, I was like, hmmm... surely something can be made from that?! So, I instantly thought, "headbands".

I put one piece around baby girl's head and pinched a section to fit, then I safety pinned it so I had the right amount of fabric to work with. Then, I got out a needle and thread and simply worked that pinched section into sort of like a blossom, ruched type flower piece. I really just manipulated the fabric with the needle into the shape I wanted. It took me longer to find my scissors than it took for me to make this headband. The raw edge just rolls over so no need to even sew that part. I kind of like the detail from the hem on the other side, but you can always cut the hem off for more of a uniform look.

I took the cut off from the other leg and pulled it over my ears. Instant earwarmers for momma! :)  This is the kind of craft I like, fast, easy, very little mess or supplies, can easily be reworked if it doesn't turn out and it's free!

Pin It
signature lisa 180x80 180ppi

Wednesday, January 16, 2013

DIY: Fabric Rag Garland and Pet Rock Valentines Tutorials

Today, I am giving you a SNEAK PEEK into my baby's nursery. I made this rag garland from scraps of colorful new and vintage fabrics, ribbon and pieces of clothing from us for some "personalization". I think it turned out perfect!  This garland is probably about 6 feet long and adds wonderful character to the room.


There are tons of tutorials online how to do it, but basically, you just cut/tear fabric scraps (mine were about 20 inches long and 2 inches wide), and knot them on your string/twine. I use this method for knotting

I only had a hodge podge of fabrics, so I made a base of white from the same fabric as the one I made for my window. Really, the garland looked just like that before I started layering more colors onto it. I add one color at a time, so I know I am evenly distributing them, so my garland won't be uneven. I have since added some more pizazz to the wall design, but that will be in another post.
 My previous DIY Pet Rock Valentine tutorial post was picked up by a cute online kids mag that featured 15 no-candy Valentine ideas that are all really cute. So be sure to visit there! Today, I am cleaning (yeah right), makng decorative hearts and stuff for my upcoming Valentine's mantle, going to work, and doing the mom thing... fun stuff! Hope your day is wonderful!
Pin It
signature lisa 180x80 180ppi

Tuesday, January 8, 2013

2013, Here We Come


2012 has been a year full of blessings and heartache. Pneumonia, having a totally adorable baby girl, my mom moving in with us, threatening suing our landlord/ us winning, moving, computer crashing and losing tons of family pics, youngest boy child entering preschool, returning to work after 6 years to an awesome salon, renewed energy in my jewelry designs, Auroa theater and Sandy Hook shootings, Jesse from My Mod Style giving me an awesome blog makeover, Obama winning again, leaving our lifelong, LDS/Mormon religion over REAL issues that most Mormons know very little or nothing about and seeing support from some family/friends and nasty claws come out from other family/friends over it... which I have to say is interesting that people will so quickly delete you simply because of a difference of faith... Now, we had our first *real* family photo shoot (by erin smith photography), just like I always wanted! 2012, you were a nasty you-know-what, but at least we got some good things out of you. Please be nice to us, 2013 as we continue our journey! But if not, we will roll with your punches and throw 'em back! Much love and peace to my lovely readers this year! And oh, my comp is STILL giving me major problems!  Visit me on pinterest to see what is inspiring me during bloggy dry spells :)

 Isaac, aka "Izzy" and "Future Heartbreaker", almost 7

Elisabeth, aka, "Lil Bit, Bit Bit, Miss Liss, Lissbiss, WizBif, Angel Bit, Fairy Berry", 7 months
Married 9 years, starting to show it!
 Caleb, aka "Cabah", "Chicken" and "Kissy Face" almost 5


 They love their grandma!
 I redid that chair, tutorial coming soon!
 She loves open mouth kisses, Elisabeth that is, not my mom....
  Year of the skinny pants, I kind of converted.
 

Pin It
signature lisa 180x80 180ppi

Sunday, December 30, 2012

Homefront: Christmas Firsts

 First discovery of lights.
First moosestache ever, in the history of the world.
First real, live Christmas tree.
 First kitchen sink bath.
 First neighborhood Christmas light hayride tour.
 First grade "Winter Holiday Program"
 First unimpressed faces
 First gingerbread houses.


Pin It
signature lisa 180x80 180ppi

Thursday, December 20, 2012

Sweet Treats: Festive Chocolate Stirring Spoons Recipe

We made stirring spoons for the boys' teachers. The ones for the teachers we tied with curling ribbon, and ornament and a gift card. Then, I made a cute jar (ideas and tutorial here) and filled them with several more spoons for the office staff. These are easy, fast, and inexpensive to make... and not to mention delicious! Makes a great treat for your cup of hot chocolate or coffee.

I put one candy cane in a ziplock bag and crushed it (a rolling pin is good, I just banged the hell out of it with a can opener.) Melt a cup of chocolate for one minute (or per package directions) and stir. I made some with dark chocolate and others with semi sweet, than I used some white chocolate to drizzle.

 Then just coat your spoons. I topped with sprinkled candy canes (sprinkle the candy cane over the bowl for an easy cleanup), marshmallows, sprinkles and melted chocolate drizzles. It's fun to come up with different combinations... some are prettier than others too.  Place on waxed paper and refrigerate for 30 minutes or until the chocolate is hard. Then wrap the spoon top in cellophane wrap and tie with a ribbon. I really wanted to dip paint the spoon handles, but ran out of time!

 
I tied on a gift card made with cardstock and glued on cute little craft jewels that you can purchase from me here, or at a most local craft stores.

Don't forget to check out our Christmas decorating home tour this year!

May your Christmas be merry and bright!

Pin It
signature lisa 180x80 180ppi
Related Posts with Thumbnails