Showing posts with label chocolate. Show all posts

Friday, July 26, 2013

Sweet Treats: Summer Berry Cool Whip Cake

I am taking a little summer vacation to see family and get crap done, so I leave you with a treat that I like to think is *healthy*, and takes but minutes to make. We have made this cake a few times this summer. The fun thing is, you can play with what fruits and berries (cherries, kiwi, banana, blueberry, blackberry, raspberry, strawberry, mandarin oranges) you want to use and the frosting too. I used chocolate frosting this time, but last time I used pink lemonade frosting and it was amazing!! Plus, you can make it all pretty and festive!!

Mix together some of your cool whip and a frosting flavor of your choice.

  Slice your angel food cake in half and frost the middle. Top that with chopped strawberries.

 I added extra dollups of cool-whip to decorate the top. Then add your berries, sprinkles, chocolate shavings, fresh mint leaves, shredded coconut or whatever. The cake tastes best if you chill it for at least 30 minutes. And enjoy, for a light and fluffy, refreshing summer treat!

Pin It
signature lisa 180x80 180ppi

Thursday, December 20, 2012

Sweet Treats: Festive Chocolate Stirring Spoons Recipe

We made stirring spoons for the boys' teachers. The ones for the teachers we tied with curling ribbon, and ornament and a gift card. Then, I made a cute jar (ideas and tutorial here) and filled them with several more spoons for the office staff. These are easy, fast, and inexpensive to make... and not to mention delicious! Makes a great treat for your cup of hot chocolate or coffee.

I put one candy cane in a ziplock bag and crushed it (a rolling pin is good, I just banged the hell out of it with a can opener.) Melt a cup of chocolate for one minute (or per package directions) and stir. I made some with dark chocolate and others with semi sweet, than I used some white chocolate to drizzle.

 Then just coat your spoons. I topped with sprinkled candy canes (sprinkle the candy cane over the bowl for an easy cleanup), marshmallows, sprinkles and melted chocolate drizzles. It's fun to come up with different combinations... some are prettier than others too.  Place on waxed paper and refrigerate for 30 minutes or until the chocolate is hard. Then wrap the spoon top in cellophane wrap and tie with a ribbon. I really wanted to dip paint the spoon handles, but ran out of time!

 
I tied on a gift card made with cardstock and glued on cute little craft jewels that you can purchase from me here, or at a most local craft stores.

Don't forget to check out our Christmas decorating home tour this year!

May your Christmas be merry and bright!

Pin It
signature lisa 180x80 180ppi

Friday, May 6, 2011

Sweet Treats: Chocoley Chocolate And Candied Apples

 
I love chocolate, but don't know a thing about using it. So, when Chocoley sent this amazing kit in exchange for a review, I was totally delighted. It came with tons of goodies I can't wait to try, but here are some of my favorites for now. They also sent me tons of information on how to actually use it. I can tell you, I typically burn chocolate while melting, but this melted so smooth and was very easy to use, and it was a rich, gourmet flavor and texture, unlike other brands of melted chocolate I have used. My readers will receive a discount and a free candy making course, so keep reading for details.


They have so many chocolate products, but I love their dark chocolate (great for snacking when no one is looking). Also, their drizzle Cocoa Lava is amazing too, and they give lots of fun ideas on how to use it.

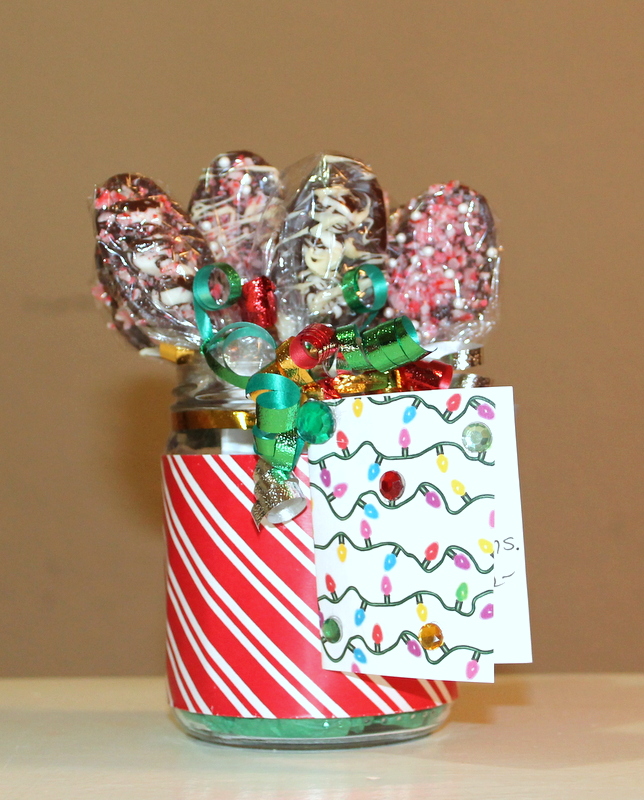
 My first ever chocolate confectioneries.... so easy and delicious.


First, I used their Caramel Cream Center (and kosher dairy) and Vanilla Cream Center (and kosher dairy) to make these candies. I just rolled them up, dipped them in melted Bada Bing Bada Boom Dark Chocolate Candy Melts (which are also celiac safe/egg free and peanut/tree nut free). After I dipped them, I laid them on wax paper to dry. Then, I melted their Drizzle and Design White Chocolate and drizzled it on. On some pieces, I dabbed a cute little sprinkle polka dot.


Then, I made these candy apples. I have never made candy apples before. It was relatively easy with their directions. I just melted the caramel (about 1/2 lb for 45 seconds) and dipped my cleaned/dried apples. After the caramel hardened, I dipped in melted chocolate and added sprinkles, walnuts and drizzled white chocolate. I so wanted to add mini marshmallows, but I was out. Wouldn't they make super cute Mother's Day gifts... or party favors?


Little Lovables readers get a 15% discount on your first order (excluding tempering machines, shipping, airbrush equipment and sale/clearance items.) Enter coupon code LITTLELOVABLES15 and it expires 5/20/2011.

Also, you can sign up for a free 7 day email chocolate candy molding course, information here.

Be sure to join the community, they have tons of videos, recipes and tutorials, like this chocolate bark and cookie dough balls.

chocoley.com 
facebook.com/bestchocolate
twitter.com/chocolatesupply

*Linked up to Sweet as Sugar Cookies Saturday Sweets Linky.
*Linked to Little Brick Ranch's Foodie Friday.
*Linked to Remodelaholic's Recipe Sundays.

Monday, February 14, 2011

Sweet Treats: Valentine's Cupcakes

Today, I made cupcakes. Once again, I used the rainbow chip mix, and dyed my frosting with the gel food coloring. Gel coloring seems to be much brighter than the liquid ones.

The little scribbles are so cute and easy. Just melt chocolate, stir it ( food color it if you wish) and pour into a ziplock bag. Lay out a long strip of wax paper and snip a tiny hole in the corner of the bag. Pipe the chocolate into shapes on the wax paper and allow to dry. Before piping, you can draw shapes on paper and place the sheet under the wax paper so you can trace those shapes. After about 20 mins or so, carefully remove and place on frosted cupcakes, (this is why I made tons of extras, for all the ones that I broke while removing). A much, much better tutorial (with pics) of this technique is here on i am baker.

Our family delivered some cupcakes to neighbors, friends and children I teach in Sunday school. But it got dark early and people weren't home, and we were getting hungry...

 ...so we grabbed pizza, went home, and gobbled cupcakes, along with these ginormously, beautiful strawberries the hubs brought home.

Aren't you loving our 5year old's, double black eye? He acquired it yesterday from jumping from our coffee table to the sofa and banged his pour little nose on the sofa arm. The same day, our 3 year old got a bead stuck up his nose. Oh the painful joys of childhood!

Our 3 year old having a melt down b/c the wrapper wasn't peeled perfectly from his cupcake.

Oh, and my husband brought flowers too. These lovely purple ones, because he didn't want to be "too cliche'" and get roses.

I hope your Valentine's Day was as sweet as ours!

Tuesday, June 8, 2010

Sweet Treats: Graham Cracker, Icing and Strawberry Summer Dessert


I love baked goods... when other people make them. Sometimes, I get excited to bake, but the energy, ingrediant checking/shopping and the stress of eating them while fighting off my boys is just too much.


 Also, the heat. Ovens, especially in {Texas} summer, I would rather avoid. Now, this treat may not be for the high society, elitest of bakers, but maybe someone out there may enjoy it, so here goes.


 I simply break the graham crackers along the perforated lines, smear on some chocolate icing (store bought or you can make your own), top with chopped strawberries and a shot of whip cream. If you have fresh mint, that is yummy on top, but my mint plant didn't move with us when we moved.


Easy, fast, no baking involved, simple ingredients and you make the amount you need in one sitting. Oh, and kids love it. Sometimes, I like to spread just a bit of frosting on the graham cracker and eat it without anything else.


Also, can you believe this monster of a strawberry? It's as big as my hand. Of course, my hands are fairly small, but still, it was huge... and most importantly, delicious.

Related Posts with Thumbnails