Monday, May 4, 2009

Chippy and Sweet


blue duck egg robin credenza white dining chairs

blue laundry room damask iron board cover

romantic blue white canopy romantic beach bedroom

If you want to DROOL over some lovely rooms (and get a little inspired too) then look at Decor Pad. I'm thinking it's kind of like a Kaboodle of design images, I think there is a forum too.

Have any of you ever visited Casa Sugar? I just discovered it today, and it has tons of flea market redo, celebrity rooms (not that I care) and decorating ideas. Just thought I'd share. This post about redoing a vintage chandelier is most excellent. (The tip on using Krylon Fusion spray paint instead of sanding is amazing).


PS. I want to know if anyone has found that PERFECT robin's egg blue aqua paint, but not too bright, not too pastel, not too blue in color, I can't find it anywhere, I need some ideas! Feel free to link photos with name of paint in the comments :)

I found Deco Chic's blog and though it is entirely in Spanish, I believe the post was about a Shabby Chic store closing. It had all of these lovely pictures and so I just had to share:

white shabby chic distressed desk

elegant shabby chic dining table

elegant distressed white shabby chic antique barn dining table chandelier

shabby chic headboard white fairy wings

shabby chic aqua blue shelf chairs nook

pink ballerina shabby chic bed

shabby chic mint green sideboard table

shabby chic white mirror living room slipcovers

shabby chic pink bathroom etagerie

shabby chic french provenical wet bar armoir


Thanks Viv for the Kreative blogger award!! Your blog is super swell too :)

Thursday, April 30, 2009

Simple Decorating Touches


I have been thrifting a lot lately, and though I am not done in here yet, you can see the direction I am taking (my two inspired posts for this room are Alchemie and sfgirlbybay). I wanted to show you how a fresh coat of paint, fabric and ribbon can transform a small space within minutes. Shop your house and see what little changes you can make to add a punch of color, elegance or texture. For more inspiration, visit The Nester's series,10 Minutes to a Room You'll Love.

This black wrought iron Pier 1 candle holder was a gift about 8 years ago~ back when black wrought iron was the only way people decorated. The pumpkin refugee from my Halloween mantle is still hanging around. The adorable picture behind the candle is from The Dreamy Giraffe, who is having a bogo sale right now!)


I painted the candle holder orange and hugged the candle with a piece of fabric that I am adding to my room in spurts and a soft blue ribbon. (ps, that ice cream cone is actually bubbles!)


I love my shabby gussied up candle holder. I got it in Granbury on my honeymoon. Sometimes, I drip her in vintage chandelier prisms and crystals. Today, she is going orange. I have no fear in painting, or dry brushing rather, since it can always be painted back in minutes. I don't use spray paint, as I want to choose where to apply the brush since I like an uneven, dappled texture that still lends a shabby, though colorful look, and some pieces should be covered while other chips and such I prefer to leave exposed. Maybe that is the hairstylist part of me talking, as I am very particular about where I place each particle of color on a strand of hair for the same reason.


The dried flowers are from various flower bouquets my sweet hubby has given me throughout the years. The tussie mussie was a rusty tin and the flowers were full and lovely, but have become victims of my toddler's sabotage, so it needed a mini makeover. A coat of black paint, a bow and $1 a bunch flowers did the trick.


I added ivory polka dots and accents to my already perfect clearance Joanns mushroom and acorn bird feeders with a lightly tipped paintbrush. Can I tell you how much I LOVE my new curtains? They are a lightweight, but still have a good drape to them, they have a nice linen texture, a warm khaki tone and though they are simple, they are softly accented. These are what brought my room together and inspired me to finish decorating. I bought 4 sets (8 panels) for my 2 large windows. You can find them HERE!


I found this ugly little shelf at Goodwill for $2. I didn't want a bold yellow, so I mixed my yellow acrylic paint with some water and applied one thin coat over the natural wood. You can still see some woodgrain, but the color yellow is perfect and soft. It holds a lot of my little treasures that I couldn't display anywhere before.


Like my jeweled bottles? get them HERE!

See that cute cameo photo? This is what it looked like before (another thrift market find). You will LOVE the results of the other two frames... coming soon!


The key holder I have had for a couple years, I covered in the same fabric, just a bit of tape in the back and wallah! I also dry brushed my ivory frame orange, (that MANY of you have, I know!!) used that fabric to back our photo and painted a rusty star robin's egg blue and tucked it into my vintage mattress spring.


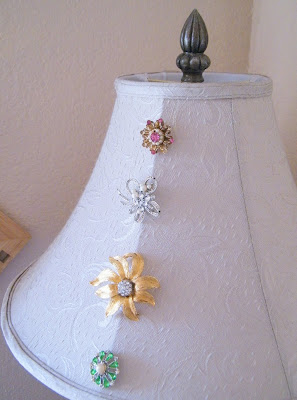
I have had this frame for about 8 years or so. It has always been cute and has served me well. But, it needed a change, and I really don't want to paint EVERYTHING, so... I threaded it with ribbon, tied a bow and hung a vintage brooch to cover the nail. See that globe in the reflection? My hubby got a 5 year gift from his work. He got to choose his gift of about 15 different things, watches, pearls, awesome binoculars, luggage... so he let me choose :)


It was that or the binoculars. It was tough, but how often do we need binoculars? Well, that very night I submitted our choice, we saw 5 COYOTES cross the road in front of our window, 3 of them lay low while 2 of them stalked a small animal and took off. That is when we needed binoculars!


Now, this is our trusty IKEA sideboard, turned tv console that we have had almost 4 years. I added the same fabric to the back of the windows, I just cut out a piece and taped it on. It matches our mantle perfectly in width and color, that makes our wall seem more seemless. The hairbands babyproofing, that floated piece of wood (which was a shelf in there- but it keeps the kids out of the equipment, so it will have to do). I do have plans for that ugly piece of wood, but it will have to wait! I am sure, this thing will be repainted once we move into a house. When I do, I will use Jenny Garland's refinishing furniture with spray paint video tutorial! More thrifted makeovers can be found at Reinvented's Linky Party.

What have you made over, or are to inspired to makeover?

Monday, April 27, 2009

Feed Your Soul [through free art]


Indie Fixx has a new little feed your soul art collective. She explains it all HERE and you can download your free (personal use only) art HERE. If you are an artist, you can contribute and if not, you can spread the word! Here's a sampling:

tree, illustrator, belleandboo, boy, love, romance, children

yarn, knitting, art, woodland, inspirational

chair, birdcage, art, illustrator, fancy, cottage

There are some seriously gorgeous works here from some of my favorite artists... I intend to get a whole slew of them and hang them on my new "art gallery wall". Don't worry, my little folks, I will update with pics soon enough. I gotta get some frames and such first!

For all of you that like vintage epherma, labels, gypsies, cards, children, babies, angels, mermaids, beauties, holidays, Marie, cherubs, horses, Strawberry Shortcake and more... then check out Suzee Que's free to use (personal) flickr stream!! Here's a sampling:

ballerina, tutu, gothic, victorian, flapper, ziegfeld, girl, model, fashion, image

speed, horse, vintage, epherma, ad


At Vintage Printable, you will find hundreds of vintage prints, namely from vintage books of science, medical, animals, nature, mustaches, wigs, fantasy and mythological, poster art, political, gnomes, steampunk... Here's a sampling:


The Virgins Whistler

bird eggs vintage book

humor, high society, poking your nose into others business
i love this one

design antique vintage library reading chair steampunk

For lovers of antique maps and sea charts, you MUST visit Helminks. They are dealers of the real genuine article not reproductions or scans, but the high quality images of them are breathtaking! Here is a sampling:

antique map of holland
Antique map of Holland

Anemographica map by Lotter
Antique Anemographica map by Lotter

Antique Map of West Africa by Linschoten

Sunday, April 26, 2009

Damask Lampshade Slipcover How To


The Shabby Nest inspired me to post this project I did the other day for her Frugal Friday Linky Party.

I wanted a new look for my lamp, but I really love the shade. Every other lamp covering tutorial required sewing a slipcover (I don't sew), or required desecrating the shade with copious amounts of glue. I love glue, but like I said, I wanted a cheap and easy way to update my shade without altering it.


Above is a quick before shot from my Spring Decorating post


I got a yard of fabric and used iron on hem tape on the very bottom (ignore the top). To know how much material you need, measure the bottom circumference of the lampshade. You will need the same amount, maybe an inch or so more just to be safe.


I flipped over my lampshade and used small pins to attach the hem-taped part to the rim of the lamp. NOTE- if you are wanting to use fringe, sandwich it between the fabric and lampshade during this part.


 Next, I pulled up the fabric and cut it a couple of inches above the top of the lamp. I just pulled and softly pleated the fabric, folded it over the edge of the top of the lamp and pinned away until all was in place.


Ta da! Now, I have a lovely damask shade with a bold pattern and soft pleats that only cost me a few dollars.


I took a .50 cent garage sale mirror, splashed on a fresh coat a paint and gave my new lamp of reflection window. I take a matching fabric (that I found for sale in the remnants section at Joanns), and tape it to the inside windows of my television cabinet to tie my new fabric in the room. Photos of that coming soon!


While on my hunt for lampshade ideas, I happened upon this gorgeous shade project from Alchemy Fine Living. The creator has an Etsy shop, BrickBasement. Bedazzle your shade frame with fabric and ribbon shards, photos and other baubles for a truly smashing look.


Now, because I want to infuse more art into my home, I am going to print off a couple of *free* (personal use only) prints from A Print A Day! Go check Yasmine's site out, tons of cute stuff.


ps. ways to keep your toddler entertained while you do this quick project:

Related Posts with Thumbnails